LVRM
Load-aware Virtual Router Monitor
Latest news
February 23, 2011:
Site launched.
Download!
Current release: source code v1.0LVRM (23Feb11) | Size (bytes):Online documentation
User guide: how to build the LVRMs and the VR instances (quickstart)
Note: the following instructions assume that the servers have a copy of Ubuntu installed.
Step 1: Install g++.
| usr@gw:~$ sudo apt-get install g++ |
|---|
Step 2: Download the current source code LVRM v1.0 (released February 23, 2011).
Step 3: Unpack the LVRM package.
| usr@gw:~$ tar xzf lvrm-1.0.tar.gz |
|---|
Step 4: Compile the LVRMs.
| usr@gw:~$ cd lvrm usr@gw:~/lvrm$ make |
|---|
Step 5: Compile the VR instances.
| usr@gw:~/lvrm$ cd VRInstance usr@gw:~/lvrm/VRInstance$ make |
|---|
Validating the LVRM setup with the simple forwarder
Configure the mapping files and routing files, which start with an integer specifying the number of IP networks in the file. Take the topology
below as an example: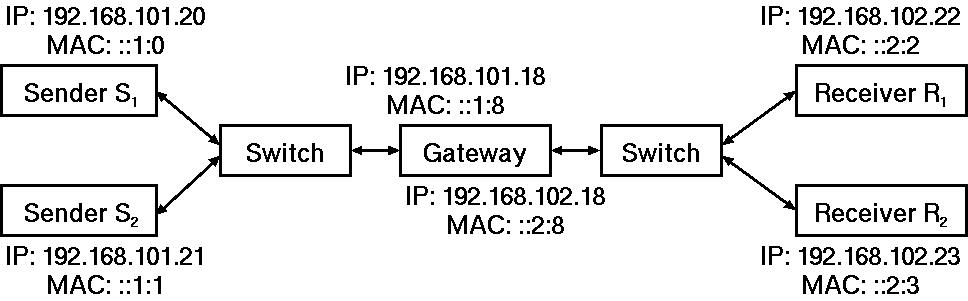
For each VR, LVRM reads the corresponding mapping file which specifies the source IP network for that VR is responsible. The format of the .map file is like:
| 2 192.168.101.0/24 192.168.102.0/24 // source IP networks for that the VR is responsible |
|---|
It means that: if an incoming frame is in above networks, LVRM dispatches the frame to that VR.
There are another type of files with the prefix same as filename of VR instance and a postfix ".route". Each VR instance reads the corresponding routing file which specifies the route table. The format of the .route file is like:
| 4 192.168.101.20/32 0:0:0:0:1:0 0:0:0:0:1:8 192.168.101.21/32 0:0:0:0:1:1 0:0:0:0:1:8 192.168.102.22/32 0:0:0:0:2:2 0:0:0:0:2:8 192.168.102.23/32 0:0:0:0:2:3 0:0:0:0:2:8 // routes on which the VR instance based, the fields are: // (i) destination IP network // (ii) destintation MAC of next-hop NIC // (iii) source MAC of local NIC to next-hop |
|---|
It means that: if an incoming frame is in above networks, VR instance remaps the MACs so that the frame follows the specified NIC to the\ next-hop.
Start the LVRM with 1 VR.
| usr@gw:~/lvrm$ sudo ./lvrm VRInstance/vrInstance VRInstance/vr1of1.map |
|---|
Start the LVRM with 2 VRs.
| usr@gw:~/lvrm$ sudo ./lvrm VRInstance/vrInstance VRInstance/vr1of2.map VRInstance/vrInstance VRInstance/vr2of2.map |
|---|
The usage is:
| usr@gw:~/lvrm$ sudo ./lvrm VR1 Map1 [2ndVR 2ndMapping] [3rdVR 3rdMapping] ... |
|---|
Configure the LVRM
A way is to set makefile marcos. Some options of marcos are:
| CORE_ALLOCATOR = \ # allocation scheme # Fixed # fixed allocation # Dynamic # dynamic allocation |
|---|
| LATENCY_ESTIMATOR = \ # latency estimation # QueueLength # instant length # WeightedQueueLength # average length |
|---|
| LOAD_BALANCER = \ # balancing scheme # JSQ # join shortest queue # Rnd # random join # RR # round robin # WRR # weighted round robin |
|---|
| SOCKET_ADAPTER = \ # receive by # PCapFile # read from Pcap file, requiring PCap installed # PFRing # read by PF_RING, requiring PF_RING installed # Raw # read by raw socket |
|---|
| THROUGHPUT_ESTIMATOR = \ # throughout estimation # ArrivalTime # time between 2 frames # WeightedArrivalTime # average time between frames |
|---|
Another way is to set constants in headers. Some constants are:
| // lvrm/LVRM.hh int CPU = 0; // LVRM's CPU dedicated |
|---|
| // lvrm/VRInstanceMonitor.hh CPU_HZ = 2.4e9; // see /proc/cpuinfo |
|---|
| // lvrm/CoreAllocator/ int CPU_NO = 6; // max no of CPU allocated |
|---|
| // lvrm/CoreAllocator/DynamicCore.hh VRI_RATE_MAX = 1e5; // max foward rate of 1 instance |
|---|
| // lvrm/LoadBalancer/wrr.hh VRI_NO = 6; // max no of instance |
|---|
| // lvrm/LoadEstimator/WeightedArrivalTime.hh weight = 9; // weight of average |
|---|
| // lvrm/LoadEstimator/WeightedQueueLength.hh weight = 9; // weight of average |
|---|
| // lvrm/SocketAdapter/PCap.hh PKT_NO = 1e8; // no of packets read |
|---|
| // lvrm/VRInstanceAdapter.hh SHMMAX = 33554432; // see /proc/sys/kernel/shmmax |
|---|